


 Capture Nijmegen Bridge September 1944 Holland")

 – Overloon, Holland, October 1944")
 – Nijmegen Bridge – September 1944")
Document Source: I really don’t remember where I found this archive or who sent it to me.
, enter the city of Soignies on September 12, 1944. (NARA via EUCMH)")
By the evening of September 15, 1944, Gen Joseph Lawton Collins’ US XIX Corps had established a bridgehead on the east bank of the Meuse River in the vicinity of Maastricht, Holland. Both, Gen Leland Hobbs’ US 30-ID and CCA of Gen Ernest N. Harmon’s US 2-AD had moved into the bridgehead and were ready to advance east. The US 30-ID had the mission of giving flank protection to the US VII Corps, whose attack in the vicinity of Aachen, Germany, constituted the current main effort of the US Forces to the east. The US 2-AD mission was to protect the area west of the Vaart Canal and Combat Command B had begun to advance in the area east of the Meuse River. Between the Vaart Canal and the Meuse River, however, lay a narrow corridor, extending halfway across the US XIX Corps front and completely in enemy hands. Obviously, this had to be cleared out before the US 2-AD could, with safety, continue its advance east of the Meuse. The US XIX Corps ordered the US 2-AD to clear the enemy from this corridor.
At 0500, September 16, the mission was turned over to Col Wm. M. Stokes, then commanding the northern force of Combat Command A (US 2-AD). At the time its force had the mission of securing the US XIX Corps boundary on the north and the division’s front along the Vaart Canal. This Combat Group, Task Force Stokes, consisted of the following units:
– HQs Co 3/66th Armored Regiment (Col Stokes)
– 3rd Battalion, 66th Armored Regiment
– Maj Harold D. Hansen’s American Norwegian 99th Infantry Battalion (Sep)
– 65th Field Artillery Battalion
– one Platoon of Able Co, 17th Armored Engineer Battalion
– a Detachment of Able Co, 48th Armored Medical Battalion
To help Col Stokes with his additional assignment, he was given the:
– 82nd Armored Recon Battalion
– Baker Co, 17th Armored Engineer Battalion
So, Task Force Stokes, as the combined force was called, completely cleared this critical corridor between September 16 and September 18. This 3-day period caused 918 enemy casualties and suffered only 93 casualties. The success of the operation was due to sound planning, good field tactics, and unusually fine cooperation between tanks and infantry. Both tank and infantry commanders agreed on this point. Col Stokes turned over the 82-ARB, Baker 17-AEB, and his Task Force, with the 82-ARB, 1 Plat George 66-AIR, and 1 Plat Able 99-IB-(S), got back to his former mission, the security along the US XIX Corps’ northern boundary and the Vaart Canal. The rest of the Task Force was ordered into assembly areas.
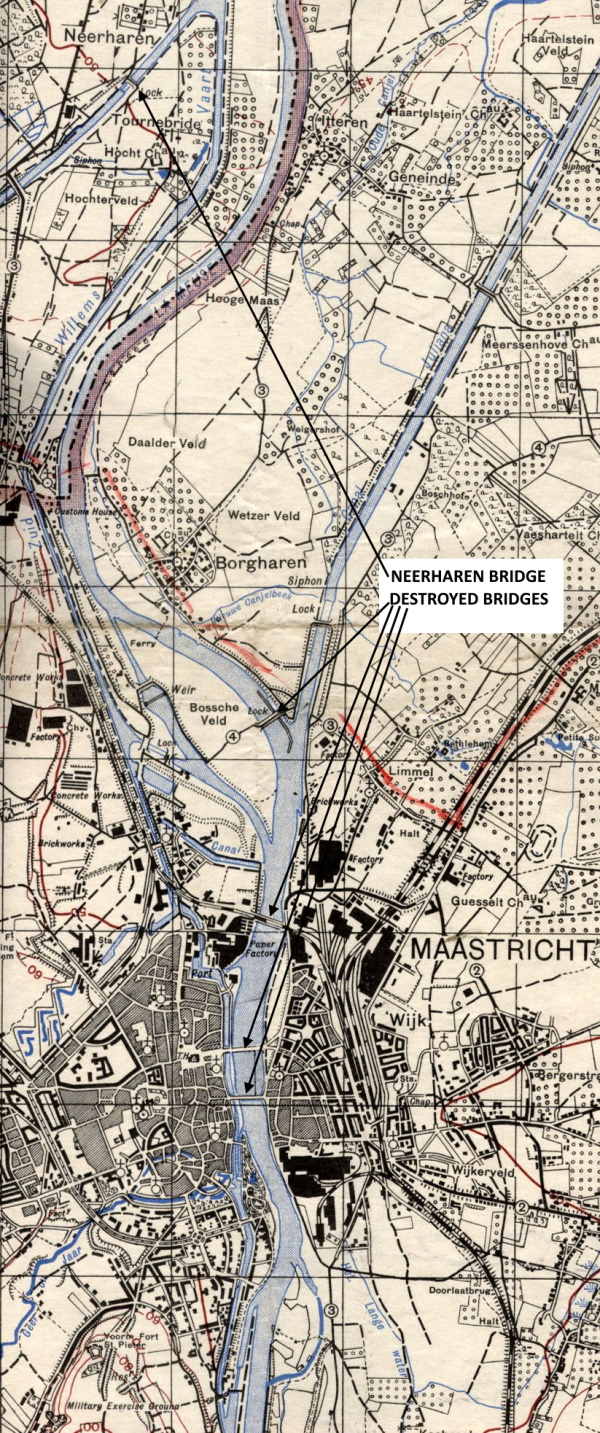
The first pre-requisite was a complete recon of the Vaart Canal for possible crossing sites. Most of it had already been reconnoitered. The job was completed on the morning of September 16. It showed that between Maastricht and the northern boundary of the Corps there were two bridges left. An old wooden one at Smeermaas in the immediate northern vicinity of Maastricht was capable to support heavy armored vehicle traffic. The other one, located at Neerharen had been partially wrecked by the Germans. Infantry in a single file could get across it, but major repairs would be necessary if vehicles were to use it. Col Stokes felt that although he could put tanks across the Smeermaas bridge and thus give the infantry some support from the very beginning, he could not depend on this bridge for his Main Supply Road (MSR). Its wooden construction made it very vulnerable to destruction either by bombs or demolition charges. Furthermore, it was in the middle of a closely built-up town and hence, in Col Stokes’ opinion, presented an easy mark for saboteurs. The repair of the bridge at Neerharen would have been very hazardous given the enemy’s ability to observe all movement in its vicinity from the high ground east of the Meuse River. Col Stokes concluded that he would have to install a bridge for his MSR either at Reckheim or further north. Col Stokes considered three possible plans of action:
– 1. the canal bridge at Reckheim and work north up the corridor
– 2. the canal bridge in the vicinity of Lanklaer and advance south to Maastricht
– 3. the canal bridge in the center of the corridor and work part of his Task Force north and part south.
Col Stokes chose the first alternative because he would have friendly troops in his rear instead of hostile forces of unknown strength; he could bring the small force up from Smeermaas to establish a bridgehead east of the canal for the crossing of the bulk of the infantry at Neerharen, and the enlarged force could make a bridgehead in the vicinity of Reckheim large enough for a Tank Battalion to maneuver in. The decision to employ tanks in attacking up the corridor was based on the following considerations:
– 1. tanks were available
– 2. the speedy accomplishment of the mission was essential
– 3. the enemy had had sufficient time to prepare hasty field positions
– 4. the enemy was believed to be holding the corridor in considerable strength because more than 500 troops had been reported to have crossed onto the corridor at Boorsheim on September 13 and about 500 SS troops or even more were reported to have recently reinforced the Meeswyck area.
No information on the presence of AT weapons was available, with the exception that recon had failed to disclose any enemy in the narrow part of the corridor at Smeermaas and for 1000 M north thereof. North of this point the enemy’s defenses were unknown except for dug-in machine-gun positions on the reverse slope of the east bank of the canal up to Lanklaer. Since the corridor varied from 30 to 250 M wide for another 2000 M, it was unwise to send any large tank force across the wooden bridge at Smeermaas. As a result of this decision, Col Stokes felt that there were two distinct phases to the reduction of the corridor:
– 1. the establishment of a bridgehead across Reckheim, which would have to be an infantry job primarily
– 2. the attack north of Lanklaer
The latter would have to move fast to prevent hostile reinforcements from coming onto the corridor, particularly at the narrow neck in the center; hence, it would have to be primarily a tank attack. Following this reasoning, the tanks taking part in the attack on September 16 and 17, were attached to the 99-IB (S); whereas on September 18, most of the 99-IB (S) (Able and Charlie Cos) were attached to the 3/66-AIR. As it turned out, this made little difference in the way in which the chain of command operated.

During the first two days of the operation, Col Stokes sent most of his communications to Maj Hansen, CO of the 99-IB (S), through Lt Henry W. Johnson, CO of How Co, 66-AIR. Lt Johnson relates that Maj Hansen was dismounted after the first 15 minutes; that he did not see him again during the operation; that his (Johnson’s) orders came from Col Stokes; and that in practice he communicated directly with his platoon leaders and them in turn with the infantry platoon leaders. On this point, Maj Hansen said that communications were very difficult throughout the operation and that messengers had to be used much of the time. But he emphasized that Col Stokes did not try to run the infantry. He was a tanker. He asked for my recommendations on the use of the infantry.
So, at about 1700, September 16, the 2nd Plat. (5 M-4’s) of How Co 66-AIR, the 2nd Plat. (5 M-5’s) of Baker Co 66-AIR, and all of Charlie Co 99-IB (S) crossed the Vaart Canal on the wooden bridge at Smeermaas. Capt Herbert C. Merlin, Charlie Co, had made no specific arrangements with the tank platoon leaders regarding tank-infantry tactics. The 99-IB (S) had worked with the 3/66-AIR for three days before this operation, and it was mutually understood that the infantry would be assigned to work with specific tanks. This was done. About 5 doughboys were assigned to each light tank and about 8 to each medium. The spearhead of Task Force Stokes moved north in a column led by the light tanks.
It met an outpost screen about 1000 M north of the bridge but progressed almost to the bridge at Neerharen before meeting any resistance of consequence. The more hostile force had concentrated in some woods. To clean it out, the tanks deployed, the lights mixed with the mediums, and the infantry dismounted. While the infantry protected the tanks from possible Panzerfausten – Panzerschrecken fire, the tanks took care of any hostile automatic fire that opened up. Resistance soon faded, but rear guards enabled a lot of Germans to run away. Near the Neerharen bridge, the enemy occupied a pillbox. The tanks plastered it with 75-MM fire. This kept the defenders from manning their weapons and stunned them. After that, the infantry had little trouble in capturing most of the occupants and killing a few who still showed signs of resistance. When, finally, the spearhead force had secured the east side of the Canal at this point, the rest of the 99-IB (S) (less 1 Plat. Able Co), assembled in the vicinity of Neerharen and prepared to cross over. At this point, the infantry was subjected to a 20 minutes concentration of hostile artillery, estimated to have been at least one battery of medium artillery.
From the high ground east of the Meuse River, the enemy had a direct observation post. To avoid bringing down an artillery concentration on the bridge itself, it was necessary to rush the troops across the bridge, a few at a time. The situation required leadership. For example, the 1st Plat. of Baker Co 99-IB (S) was pinned down after suffering 4 casualties. T/Sgt Roland I. Asleson, the platoon leader, demonstrated outstanding leadership in rallying his platoon and getting them across the bridge. It was now about 1900. Maj Hansen realized that the important thing was to get his force north out of the narrowest part of the corridor before dark. Fortunately, no AT weapons were encountered, only some foxholes along the east bank of the Canal, which were facing west. The tanks rolled up and pasted these positions with 75-MM and MG fire. When they lifted their fire, the infantry advanced and took TF Stokes’ first large bunch of POWs. Baker’s CO, Lt Gunderson, was injured late in the day and had to be evacuated. Lt Murton Swenson became the company commander. By 2100 the troops had advanced into the broad part of the corridor and secured an outpost line stretching across it. The tanks were deployed inside the bivouac areas of the companies they work with.
The next morning, Maj Hansen attacked at 0530 with Charlie Co 99-IB (S) on the left and Baker Co 99-IB (S) on the right. Able Co 99-IB (S) was kept in reserve as it was short one platoon that was guarding the west bank of the Vaart Canal. The tank-infantry teams consisted of about one squad to a tank. Just as the troops were preparing to attack, the enemy opened up with fire from a stone wall or dike that ran at an angle across the corridor. This caused some delay, but then a mist developed, and under its cover the tanks followed by the infantry, advanced right up to the wall, receiving only inaccurate, sporadic fire. The enemy had fled. The tanks now turned left and got west nearly to the Canal to get around the wall. The infantry swung right and advanced northeast with troops on both sides of the wall. When they reached a woods in the vicinity of the road to Reckheim, they waited for the tanks to rejoin them as Maj Hansen felt that a combined tank-infantry attack on the woods would be the cheapest way to reduce the enemy. The tanks arrived after about an hour and the woods were overrun without difficulty. There were three main fights on Sept 17, at Uykhoven, Boorsheim, and
Cothem.
At Uykhoven, Task Force Stokes was opposed to a stubborn resistance that came from young Luftwaffe troops. All of the enemy’s prepared positions faced west and our tanks and infantry flanked these positions by attacking from the south and overwhelming the defenders with the volume of their firepower. A considerable quantity of material was captured at Uykhoven. The rest of How Co 66-AIR and its CO, Lt Johnson, joined the task force had crossed the canal at Smeermaas at about 1000. Their arrival was a tremendous help. The two infantry company commanders were able to assign all their men to specific tanks, whereas previously there had not been enough tanks to go around. Their arrival also made possible a well-conceived maneuver whereby Boorsheim, Cothem, and the ‘neck’ of the corridor was secured simultaneously.
Baker Co 99-IB (S) (less 1 Plat.) and a Plat. of How Co 66-AIR were sent to Cothem. Charlie Co 99-IB (S) and How Co 66-AIR (less 1 Plat.) left positions east of Boorsheim while the platoon of light tanks and the remaining rifle platoon of Baker Co 99-IB (S) started to clean Boorsheim. When the two towns were about half cleaned out, Charlie Co 99-IB (S) and How Co 66-AIR (less 1 Plat.) moved straight for the corridor’s ‘neck’ (just east of Mechelen) and secured it with little difficulty. Control of this neck by the hostile forces that might have retreated to it from Boorsheim would have held up our advance and cost us dearly to force a passageway.
About 100 POWs were taken in Boorsheim and about 150 at Cothem. Cothem was the harder fight as there were more troops there and they were protected by fires from across the bend in the Meuse River. A few did escape in boats across the Meuse, but most fought as long as they could and then surrendered. Prisoners were still being gathered in from this area the next morning.
